What is an access token?
Access tokens carry the necessary information to access a resource directly. In other words, when a client passes an access token to a server managing a resource(any kind of resource files, images, database), that server can use the information contained in the token to decide whether the client is authorized or not.
Access tokens usually have an expiration date and are short-lived.
What is a refresh token?
Refresh tokens carry the information necessary to get a new access token. In other words, whenever an access token is required to access a specific resource, a client may use a refresh token to get a new access token issued by the authentication server.
Common use cases include getting new access tokens after old ones have expired, or getting access to a new resource for the first time.
Refresh tokens can also expire but are rather long-lived. Refresh tokens are usually subject to strict storage requirements to ensure they are not leaked. They can also be blacklisted by the authorization server.
What is Sliding-sessions?
Sliding sessions basically extend the session duration so that the users are not intermittently logged out in the middle of a transaction.
Sliding-sessions are sessions that expire after a period of inactivity. As you can imagine, this is easily implemented using access tokens and refresh tokens.
When a user performs an action, a new access token is issued. If the user uses an expired access token, the session is considered inactive and a new access token is required.
Whether this token can be obtained with a refresh token or a new authentication round is required is defined by the requirements of the technical team.
What are JSON Web Tokens (JWT)?
JSON Web Token (JWT) is an open standard (RFC 7519) that defines a compact and self-contained way for securely transmitting information between parties as a JSON object. This information can be verified and trusted because it is digitally signed. JWTs can be signed using a secret (with the HMAC algorithm) or a public/private key pair using RSA or ECDSA.
Citation: https://jwt.io/introduction/
Login/Signin Flow
Let’s take a quick look at the login/sign in flow in a typical web application or mobile application.
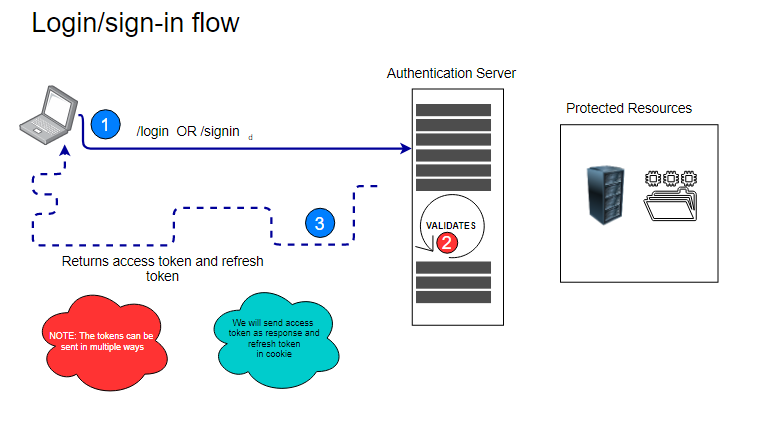
Successful access flow diagram
On successful login access to protected resource is granted.

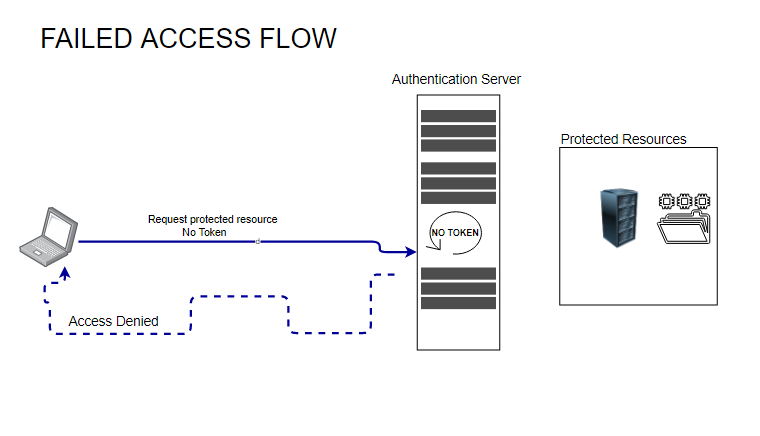
Failed Access Flow
Of course when the user doesn’t presents with correct credentials (or knocks at the wrong door), then he is shown the way out politely. 🙂
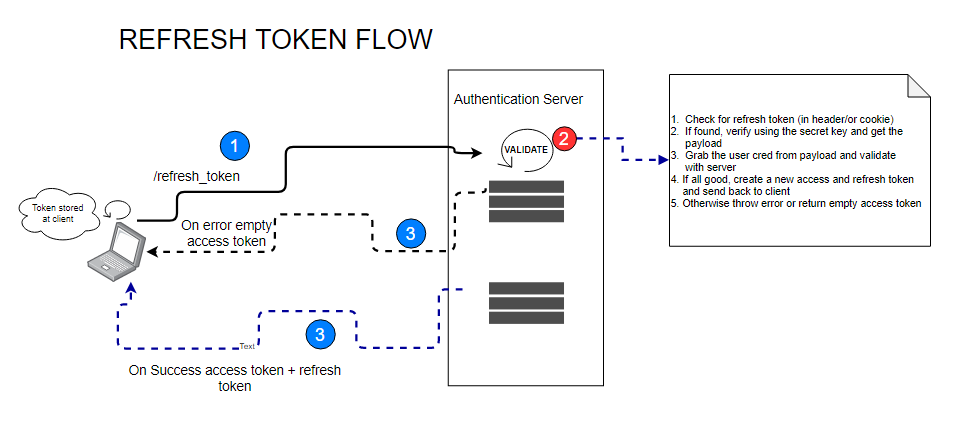
Refresh Token Flow
A refresh token is a handy tool. Let’s take a quick look at the flow before we proceed with implementation details.
NOTE:
The decision to to store token at client can be take based on your technical requirements. Localstorage, cookie etc can be used as needed.
Server Setup
First let’s create a simple server to serve authentication tokens. Our server will have the following routes.
/ping
Test the heartbeat of our server
/register
Create a new account in the fake db (Please feel free to use any backend DB here)
/login
Creates and sends back the refresh and access token to the client
/logout
Clears the token
/protected
Only provides access if the token is provided
/refresh_token
Used to create new access_token
JSONWebTOken
We will be using the node.js jsonwebtoken npm library/package. You can use other library as well.
Please install the below listed packages. You can also, directly use the package.json from the github (source code) and do an npm i to install all these packages.
"bcryptjs": "^2.4.3",
"jsonwebtoken": "^8.5.1",
"cors": "^2.8.5",
"dotenv": "^8.2.0",
"express": "^4.17.1",
The most important among the listed one from JWT perspective is bcryptjs and jsonwebtoken. The rest are eeded for supplimentary activity like securing your credentials (dotenv), creating a server (express), allow cross origin request sharing (cors).
Create a .env within the “server” folder (dotenv).
First. create a .env file in the “server” folder to store your secrets and port. This file is not to be committed in git(or other source control system)
Add the below key/value pairs
ACCESS_TOKEN_SECRET=nodejwttoken
REFRESH_TOKEN_SECRET=notsosecret
PORT=4000
NOTE:
The most important aspect in token based authentication is to have a very strong key (and keep the keys rotating at a certain interval to minimize the scope of attack).
The index.js file (or the main server code)
Let’s create a file index.js in the server folder.
require('dotenv').config();

const express = require('express');
const cookieParser = require('cookie-parser');
const cors = require('cors');
const {verify} = require('jsonwebtoken');
const {hash, compare} = require('bcryptjs');
const {fakeDB} = require('../db/fake-db.js');

const {
  createAccessToken,
  createRefreshToken,
  sendRefreshToken,
  sendAccessToken
} = require('./tokens.js');

const {isAuth} = require('./auth.js');

const server = express();

// Use middleware
server.use(cookieParser());

server.use(
  cors({
    origin: 'http://localhost:3000',
    credentials: true,
  })
)

// Read json encoded body data
server.use (express.json());

// Url encoded bodies
server.use(express.urlencoded({ extended:true}));
The initial setup just loads up the essential packages and sets up an express web server.
We are using CORS to enable cross origin request (Here you may have to change the URL’s as required)
More details here https://www.npmjs.com/package/cors
Do also note we are using a fake db here. Our main authentication related code is split into 4 important methods as shown below (which is stored in tokens.js file)
const {
  createAccessToken,
  createRefreshToken,
  sendRefreshToken,
  sendAccessToken
} = require('./tokens.js');
We will take a look at this code block shortly.
Now, let’s spin up our server.
Starting the Server
server.listen(process.env.PORT, ()=> {
  console.log(`server listening on port ${process.env.PORT}`);
});
Let’s begin by writing our routes.
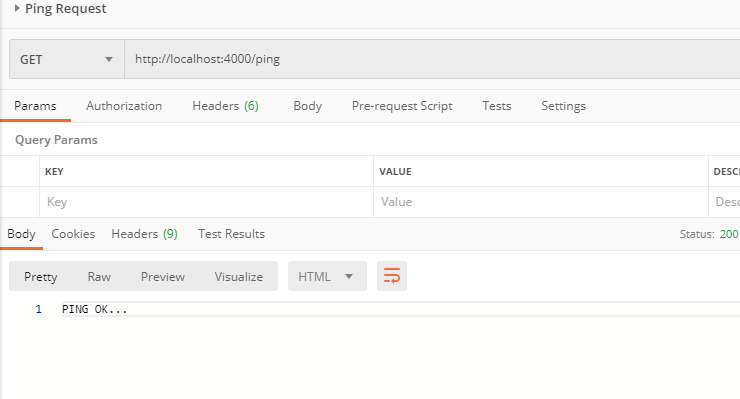
/ping
/ ping route is use to test if our server is up. You can do your thing here.
// Test api for heartbeat
server.get("/ping", async(req, res) => {
  res.send("PING OK...");
});
Testing /ping using Postman (or feel free to use other tool)
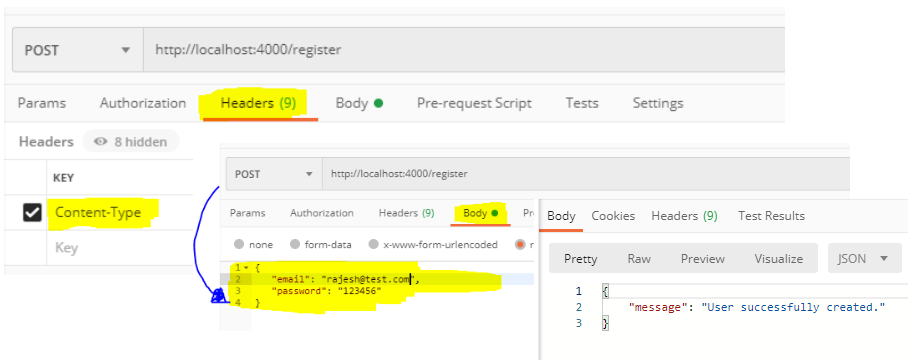
/register
/register route is use to regiser/create a new user in the system.
// 1. Register a user
server.post('/register', async(req, res) => {
  const {email, password} = req.body;
  try {

      let user = fakeDB.find(user => user.email === email);
      console.log(user);

      if (user) throw new Error('User already exist');

      const hashPassword = await hash(password,10);
      console.log(hashPassword);
      fakeDB.push({
        id: fakeDB.length,
        email,
        password: hashPassword
      });

      console.log(fakeDB);

      res.send({
        message: "User successfully created."
      })

  } catch(err) {
    res.send({
      error: `${err.message}`
    })
  }
})
The code is quite straightforward to understand. In case you are using mongodb, mysql or other, use the appropriate client library or use some ORM’s to talk to the database.
Testing /register using Postman
/login
The users of the system will take this route to identify themselves with the server. This is where the system creates the access and refresh token as well.
server.post('/login', async(req, res) => {
  // Grab the email, password from the request body
  const { email, password } = req.body;

  try {
    // 1. Find user in array. If not exist send error
    //  OR make a DB call using your favorite client library
    const user = fakeDB.find(user => user.email === email);


    // 2. If unable to find the user throw the error
    if (!user) throw new Error('User does not exist');

    // Compare encrypted password and see if it checks out.
    // Send error if not valid
    // NOTE: We are using the compare function from bcryptjs library

    const valid = await compare(password, user.password);

    if (!valid) throw new Error('Password not correct');

    // 3. Create Refresh- and Accesstoken using our helper method which
    //    in turn uses the sign() method of the jsonwebtoken package.
    const accesstoken = createAccessToken(user.id);
    const refreshtoken = createRefreshToken(user.id);

    // 4. Store Refreshtoken with user in "db"
    user.refreshtoken = refreshtoken;

    // 5. Send token. Refreshtoken as a cookie and
    //    accesstoken as a regular response.  We will take a look at
    //    the two methods shortly.
    sendRefreshToken(res, refreshtoken);
    sendAccessToken(res, req, accesstoken);
  } catch (err) {
    res.send({
      error: `${err.message}`,
    });
  }
});
To avoid being verbose I am letting the code talk to you with enough required comments.
Now, before we proceed with further routes, head over to token.js file and let’s take a quick look at all the above helper methods.
token.js (You can call it whatever you want)
Again I am commenting the code heavily to avoid verbosity.
const { sign } = require('jsonwebtoken');

// Create tokens
// ----------------------------------
const createAccessToken = userId => {
  return sign({ userId }, process.env.ACCESS_TOKEN_SECRET, {
    expiresIn: '15m',
  });
};

// Create Refresh Token using the KEY
const createRefreshToken = userId => {
  return sign({ userId }, process.env.REFRESH_TOKEN_SECRET, {
    expiresIn: '7d',
  });
};

// Send access token as response
// ----------------------------------
const sendAccessToken = (res, req, accesstoken) => {
  res.send({
    accesstoken,
    email: req.body.email,
  });
};

// Send Refresh token as cookie (you can send this in response)
// as well
const sendRefreshToken = (res, token) => {
  res.cookie('refreshtoken', token, {
    httpOnly: true,
    path: '/refresh_token',
  });
};

// Finally export the method so that other files can use it.
module.exports = {
  createAccessToken,
  createRefreshToken,
  sendAccessToken,
  sendRefreshToken
};
Testing /login using Postman

/logout
To signout from the application this route is used.
// 3. Logout a user
server.post('/logout', (_req, res) => {
// Since we are using cookie for refreshtoken we clear
// up the cookie
res.clearCookie('refreshtoken', { path: '/refresh_token' });
// In real application refreshtoken will be stored in the DB
// Write the code here to remove refresh token from the db.
return res.send({
message: 'Logged out',
});
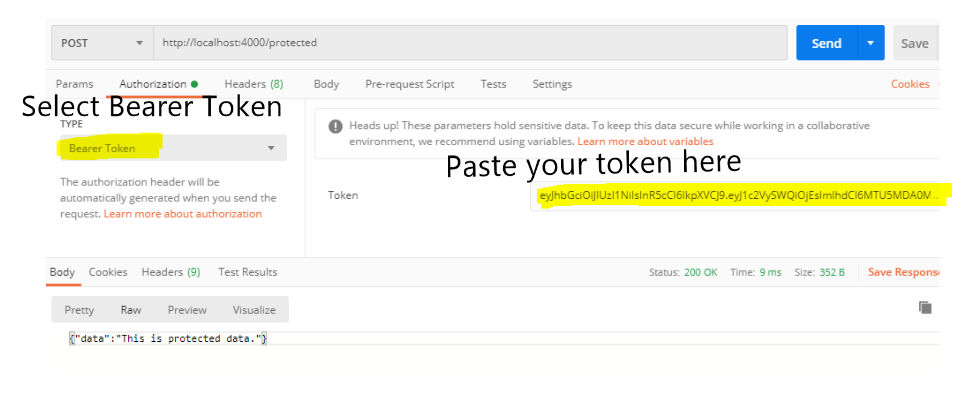
});/protected
Now, this can be any route that needs the access token (so, these are any of your protected routes. I have just one here and hence calling it /protected.
But in real apps you will see /accounts/, /subscriptions etc.
server.post('/protected', async (req, res) => {
  try {
    // As usual being a good developer we are putting the reusable code
    // in a separate file , isAuth()...(Ref: auth.js in our case)
    const userId = isAuth(req);

    // And if everything is OK, the user is served with the
    // requested data.
    if (userId !== null) {
      res.send({
        data: 'This is protected data.',
      });
    }
  } catch (err) {
    res.send({
      error: `${err.message}`,
    });
  }
});
The core of the logic is in isAuth function, so let’s take a look at it.
isAuth (auth.js)
// Grab the verify() method from jsonwebtoken
const { verify } = require('jsonwebtoken');

// isAuth() -> receives request object as paramter
const isAuth = req => {
  // Grab the authorization header from req.headers (the client needs to
  // pass this header for every protected resource/page/file etc.
  const authorization = req.headers['authorization'];

  // If the authorization header is not found throw the error
  if (!authorization) throw new Error('You need to login.');

  // Based on 'Bearer ksfljrewori384328289398432'
  // Otherwise grab the header and split it on space and grab the first
  // element from the array
  const token = authorization.split(' ')[1];

  // Verify the request by passing the token to the verify method along
  // with the access key
  const { userId } = verify(token, process.env.ACCESS_TOKEN_SECRET);

  return userId;
};

module.exports = {
  isAuth,
};
NOTE: The request header is in the form
‘Bearer ksfljrewori384328289398432′
So, we split this string on space character ” ” and passes the 1st item in this case for e.g ksfljrewori384328289398432 to the verify method.
We will take a look how the client can pass this header information to the server shortly.
Testing /protected route using Postman. To test protected route first do a login request and copy the token from the respond. This token will be needed in the /potected route.
Request to grab the token
Pass this token to the /protected route
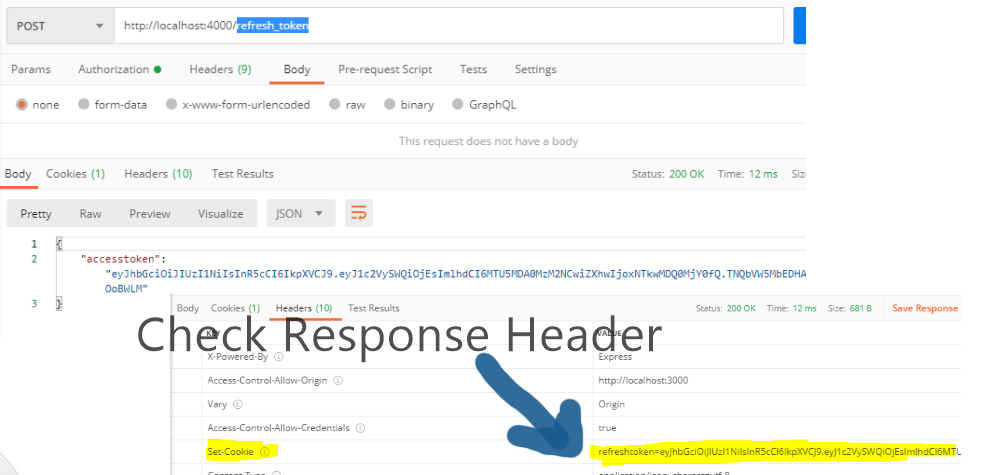
/refresh_token
The client/enduser will use the /refresh_token URL to generate a new access_token. This can be used internally by the system as well.
Let’s dig into the code.
require('dotenv').config();

const express = require('express');
const cookieParser = require('cookie-parser');
const cors = require('cors');
const {verify} = require('jsonwebtoken');
const {hash, compare} = require('bcryptjs');
const {fakeDB} = require('../db/fake-db.js');

const {
  createAccessToken,
  createRefreshToken,
  sendRefreshToken,
  sendAccessToken
} = require('./tokens.js');

const {isAuth} = require('./auth.js');

const server = express();

// Use middleware
server.use(cookieParser());

server.use(
  cors({
    origin: 'http://localhost:3000',
    credentials: true,
  })
)

// Read json encoded body data
server.use (express.json());

// Url encoded bodies
server.use(express.urlencoded({
  extended:true}));

server.listen(process.env.PORT, ()=> {
  console.log(`server listening on port ${process.env.PORT}`);
});

// Test api for heartbeat
server.get("/ping", async(req, res) => {
  res.send("PING OK...");
});

// STEPS
// 1. Register a user
server.post('/register', async(req, res) => {
  const {email, password} = req.body;
  try {

      let user = fakeDB.find(user => user.email === email);
      console.log(user);

      if (user) throw new Error('User already exist');

      const hashPassword = await hash(password,10);
      console.log(hashPassword);
      fakeDB.push({
        id: fakeDB.length,
        email,
        password: hashPassword
      });

      console.log(fakeDB);

      res.send({
        message: "User successfully created."
      })

  } catch(err) {
    res.send({
      error: `${err.message}`
    })
  }
})

// 2. Login a user
server.post('/login', async(req, res) => {
  const { email, password } = req.body;

  try {
    // 1. Find user in array. If not exist send error
    const user = fakeDB.find(user => user.email === email);
    if (!user) throw new Error('User does not exist');
    // 2. Compare crypted password and see if it checks out. Send error if not
    const valid = await compare(password, user.password);


    if (!valid) throw new Error('Password not correct');

    // 3. Create Refresh- and Accesstoken
    const accesstoken = createAccessToken(user.id);
    const refreshtoken = createRefreshToken(user.id);

    // 4. Store Refreshtoken with user in "db"
    // Could also use different version numbers instead.
    // Then just increase the version number on the revoke endpoint

    user.refreshtoken = refreshtoken;
    // 5. Send token. Refreshtoken as a cookie and accesstoken as a regular response
    sendRefreshToken(res, refreshtoken);
    sendAccessToken(res, req, accesstoken);
  } catch (err) {
    res.send({
      error: `${err.message}`,
    });
  }
});

// 3. Logout a user
server.post('/logout', (_req, res) => {
  res.clearCookie('refreshtoken', { path: '/refresh_token' });
  // Logic here for also remove refreshtoken from db

  return res.send({
    message: 'Logged out',
  });
});

// 4. Setup a protected route

server.post('/protected', async (req, res) => {
  try {
    const userId = isAuth(req);
    if (userId !== null) {
      res.send({
        data: 'This is protected data.',
      });
    }
  } catch (err) {
    res.send({
      error: `${err.message}`,
    });
  }
});

// 5. Get a new accesstoken with a refresh token
server.post('/refresh_token', (req, res) => {
  // Grab the refreshToken from the cookie (in or case)
  // In case you are passing it in header use the approprite code.
  const token = req.cookies.refreshtoken;

  // If we don't have a token in our request respond by sending empty accesstoken
  if (!token) return res.send({ accesstoken: '' });

  // We have a token, so let's verify it!
  let payload = null;
  try {
    payload = verify(token, process.env.REFRESH_TOKEN_SECRET);
  } catch (err) {
    // If any error in verification, like incorrect token or of the token is
    // tamppered then send an empty accesstoken
    return res.send({ accesstoken: '' });
  }

  // If token is valid, check if user exist in or database/data sstore
  const user = fakeDB.find(user => user.id === payload.userId);

  // If user not found send empty access token
  if (!user) return res.send({ accesstoken: '' });

  // User exist, check if refreshtoken exist on user.  This is required, as we store
  // refreshtoken in our store we have to ensure both matches.
  if (user.refreshtoken !== token)
    return res.send({ accesstoken: '' });

  // If all OK create new Refresh- and accesstoken
  const accesstoken = createAccessToken(user.id);
  const refreshtoken = createRefreshToken(user.id);

  // Update refreshtoken on user in db
  // You can use your DB udpate logic here
  user.refreshtoken = refreshtoken;

  // All good to go, send new refreshtoken and accesstoken
  sendRefreshToken(res, refreshtoken);
  return res.send({ accesstoken });
});
Testing /refresh_token
Ensure you are already logged in (as the refresh_token cookie wills till beavailable) and make a post request to /refresh_token.
The output will be you will get a new access token.
I have also created a client code using vanilla javascript which is available in the github repo.
The important code blocks are here for your reference.
JavaScript Front End
Let’s take a look at the login code.
Login
const onLogin = async (e) => {
    e.preventDefault();
    let email = document.querySelector("#email").value;
    let password = document.querySelector("#password").value;

    const result = await (await fetch('http://localhost:4000/login', {
      method: 'POST',
      credentials: 'include', // Needed to include the cookie
      headers: {
        'Content-Type': 'application/json',
      },
      body: JSON.stringify({
        email: email,
        password: password,
      }),
    })).json();

    if (result.accesstoken) {
      window.accesstoken = result.accesstoken;
      // navigate to home
    } else {
      console.log(result.error);
    }
  };
Here we are storing the accesstoken in the window object (Please feel free to use localstorage).
Logout
 const logout = document.querySelector("#logout");
    if (!logout) return;

    logout.addEventListener('click', async () => {
      await fetch('http://localhost:4000/logout', {
        method: 'POST',
        credentials: 'include', // Needed to include the cookie
      });
      // Clear user from context
      this.window.accesstoken = null;
      // Navigate back to startpage
      this.window.navigate("home");
    });
Register new user
const register = async (e) => {
    e.preventDefault();
    let email = document.querySelector("#email").value;
    let password = document.querySelector("#password").value;


    const result = await (await fetch('http://localhost:4000/register', {
      method: 'POST',
      headers: {
        'Content-Type': 'application/json',
      },
      body: JSON.stringify({
        email: email,
        password: password,
      }),
    })).json();
    if (!result.error) {
      console.log(result.message);
      //navigate('/');
    } else {
      console.log(result.error);
    }
  }
Accessing Protected routes/page
window.protected = async function (parent) {
    if (!window.accesstoken) {
      window.navigate('login'); return;
    }
    console.log('found:', window.accesstoken);
    const result = await (await fetch('http://localhost:4000/protected', {
      method: 'POST',
      headers: {
        'Content-Type': 'application/json',
        authorization: `Bearer ${window.accesstoken}`,
      },
    })).json();
    if (result.data) {
      parent.innerHTML = result.data;
    } else {
      parent.innerHTML = "Not authorised!";
    }
  }
So we grab the access token from window and send to to the fetch api.
Refresh Token
The below code will update the accesstoken using the refreshtoken. (NOTE: Access tokens are short lived, for e.g. 15 minutes). So, if the user is still on the website and 15 minutes may have elapsed, the checkRefreshToken ensures to update the new access token so that the user is not inadvertently logged out from the applicaion.
async function checkRefreshToken() {
  const result = await (
    await fetch('http://localhost:4000/refresh_token', {
      method: 'POST',
      credentials: 'include', // Needed to include the cookie
      headers: {
        'Content-Type': 'application/json',
      }
    })).json();
  window.accesstoken = result.accesstoken;
}

window.navigate = navigate;

checkRefreshToken();
To test out the front end application do the following steps.
- Change director(CD) into “frontend” folder.
- To install dependencies run npm i
- To start the server run npm run dev
- Do ensure the client URL is registered withe the server in the cors section.
The full source code for backend as well as a javascript frontend is here
I open up two terminals, in the 1st terminal I cd into the server/src folder and run “nodemon index.js”. In the 2nd terminal I cd into the frontend folder and run “npm run dev”. My browser opens up to “localhost:3000” with an “Cannot GET /”. I don’t understand how the server suppose to load the index.html file from the public folder.
For the frontend, I am using lite-server. So, hoping npm i is done, if you take a look at https://github.com/rajeshpillai/node-jwt-step-by-step/blob/master/frontend/bs-config.json file, you will be able to find the lite-server configuration from where the files are served.
https://www.npmjs.com/package/lite-server
The quickest way is you can pull down the repo and try out the example and make the needed modifications. You can also use your own code for frontend using vanilla js, react angular etc. Make sure to correctly point the endpoint URL to your node server (in case you are coding on your own).
I left out the “bs-config.json” file, saving it from the repro solved the problem. Thanks…
Thanks for the confirmation.
With other examples I have tried, the application runs from one terminal, meaning the server runs in one terminal and serves “index.html” from a public folder when the client navigates to localhost:3000. What’s the reason to have two or more terminals? If there are any good books please let me know.
The primary purpose was to demonstrate how to create jwt authentication which can be consumed by any client on same server or different server. I kept client separate to bring up the CORS issue (as in majority of SPA(single page application) you have to deal with CORS. On same server this issues don’t come up.
You can run the client from the same server as well (as the client code is only for demonstration the server) as the server is independent. You just have add your client code there.