Just enough Linux to make you a full stack developer. Notes from my learning journal.

CAUTION: Linux OS is case sensitive
NOTE: If you see a # in front of any commands, I have put it there as a comment. Do not put it when you try out the commands/scripts.
Installation
As there are various flavors of Linux distribution, please visit the respective website for installation details.
For windows users, the easiest setup is to use WSL (Windows Subsystems for Linux) which is already available with the latest version of windows 10.
File System
Everything in a Linux system is a file. Some common Linux File System Directories are listed below.
Linux File System Directories
📁/bin: Where Linux core commands reside like ls, mv.
📁/boot: Where boot loader and boot files are located.
📁/dev: Where all physical drives are mounted like USBs DVDs.
📁/etc: Contains configurations for the installed packages.
📁/home: Where every user will have a personal folder to put his folders with his name like /home/rajesh.
📁/lib: Where the libraries of the installed packages located since libraries shared among all packages
📁/media: Here is the external devices like DVDs and USB sticks that are mounted and you can access their files from here.
📁/mnt: Where you mount other things Network locations and some distros you may find your mounted USB or DVD.
📁/opt: Some optional packages are located here and this is managed by the package manager.
📁/proc: Because everything on Linux is a file, this folder for processes running on the system, and you can access them and see much info about the current processes.
📁/root: The home folder for the root user.
📁/sbin: Like /bin, but binaries here are for root user only.
📁/tmp: Contains the temporary files.
📁/usr: Where the utilities and files shared between users on Linux.
📁/var: Contains system logs and other variable data.
Reference: https://likegeeks.com/linux-file-system/
What is Shell?
The shell is the command interpreter in an operating system such as Unix or GNU/Linux. It is a program that executes other programs.
It provides a computer user an interface to the Unix/GNU Linux system so that the user can run different commands or utilities/tools with some input data
Common shells available (Note that each shell has its merits and demerits). I am listing here the commonly available shell for reference.
- The Bourne Shell (sh) — (Year 1977)
- The C shell (csh) — (Year 1978)
- The Korn SHell (ksh) — (Year 1983)
- The Bourne-Again Shell (bash) — (Year 1989) -> The commonly used shell
- The Z shell (Zsh) — (Year 1990) — Commonly used and also default in macOS
NOTE: Ubuntu, CentOS uses default bash shell.
What is “Terminal?”
It’s a program called a terminal emulator. This is a program that opens a window and lets you interact with the shell. There are a bunch of different terminal emulators you can use.
Most Linux distributions supply several, such as: gnome-terminal, konsole, xterm, rxvt, kvt, nxterm, and eterm.
For e.g. Ubuntu uses Gnome Terminal by default.
Command Line
The below listed are the most commonly used commands. Please note, all the commands demonstrated below are executed withing the Linux terminal window.
Date related commands
date # shows the current date
cal # shows calendar of the current month
Download files
wget <url> # when giving the url don't specify the <> brackets
Let’s download some sample data to work with. Execute the below commands to download some population data that is openly available.
wget -O population.csv "https://population.un.org/wpp/Download/Files/1_Indicators%20(Standard)/CSV_FILES/WPP2019_TotalPopulationBySex.csv"
The above command will download the data and save it in a file named “population.csv”. This is quite a large file with about 200 hundred thousand lines.
NOTE: If you don’t specify -O <filename> wget will save it by the default fielname. ‘O’ is uppercased.
To see the contents of the file type in the below command
cat population.csv
head
As you observe the above file is quite huge, if you want to see only a few sample records, use the head command. The head command will list the first 10 lines.
head population.csv
tail
Similarly, the tail command displays the last 10 lines from the file.
tail population.csv
NOTE: The head and tail command takes some options which allow you to specify the number of lines required, bytes, etc.
For eg. To display the first 5 lines use the below head command with the -n parameter.
head -n 5 population.csv
The tail command additionally takes an option +, to start displaying from the specific line until the end of the file. (This feature is not available in the head command)
For eg.
tail +25 population.csv
Additionally, the tail command also takes a parameter -f to follow/monitor the file.
tail -f population.csv
The above command displays the last 10 lines and the terminal goes into a waiting mode. Now if some other application is adding more data to the file, the terminal will automatically display the newly added lines.
NOTE: To cancel the command press CTRL + C
TIP: tail -f is very useful for monitoring log files.
Unzip zip files
unzip <filename>
Create Directory
mkdir <directoryname>
Go to Home directory
cd ~
Check Current Directory
pwd # should shows "home/rajesh" for me
Create multiple nested directories in one command
# NOTE: -p is required.  it will first create directory d1
# then within d1 it will create directory d2 and then finally
# it will create directory d3 within d2
mkdir -p d1/d2/d3
Go to d3 directory
cd d1/d2/d3
Go to the parent directory (Assume you are in d3)
cd ..   #  You will goto d2
cd ..   #  You will goto d1
cd ..   #  You will goto home directory (as thats' where we started from)
OR (assuming you are in d3 folder) You can use this one command as well
cd ../../../
Go to last working directory from where we moved
cd -
Listing Directories
ls # short listing of all files and directories
List the contents of the specific directory
ls <directoryname>
Listing based on pattern (Here assuming d1 is accessible from your current folder)
# list all the filename with .csv extension within the d1 directory
ls d1/*.csv
Listing Directory Recursively
ls -R d1
Long Listing
ls -l # will show long listing with more details
The output of the long list is shown below.
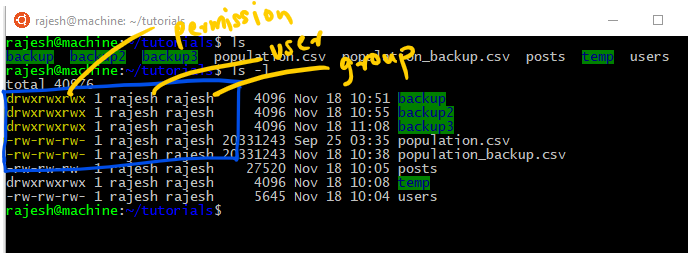
Observe the highlighted section.
The drwxrwxrwx sections are for permission settings. The ‘d’ indicates that the entry is for a directory.
r →read permission
w →write permission
x →execute permission (execute is for scripts and for a directory it means you can enter a directory (i.e. cd into it and to access any of its file)
We will cover more about permissions in details.
Change Directory
cd <directoryname>
Clear Screen
clear
Create a file
touch hello.txt
Show the content of the file
cat hello.txt # the file is empty so nothing is shown
Getting Help
whatis wc
It outputs
wc (1) — print newline, word, and byte counts for each file
man command (Get very detailed help)
man wc
To quite the help window type ‘q’
Get a history of all previously executed commands
history
The output should resemble something like below (but your commands listed could be different)
1 pwd
2 node -v
3 pwd
4 sudo apt update && sudo apt upgrade
5 node -v
6 git status
7 python
8 vi
9 exit
10 pwd
11 f:
12 e:
13 cd e:/
14 drive
15 ls
16 pwd
17 cd .
18 ls
19 pwd
20 md lab
21 mkdir lab
22 ls
23 history
NOTE: There is a number against each command
We can execute any of the above commands from history using the bang/exclamation! operator
For eg.
!19 # will execute the command pwd
Ctrl + R
Reverse interactive search. (You don’t need to type in the + character). Type in the command and press enter to execute it
Up Arrow
Within the terminal, if you press up-arrow, it will move to the previously executed command.
Count words in a file
wc [filename]
- It is used to find out number of lines, word count, byte and characters count in the files specified in the file arguments.
- By default it displays four-columnar output.
wc population.csv # counts words and prints it on the standard output
Output

Pipe | (redirecting)
We use the pipe | symbol for redirecting the output.
cat population.csv | wc
Take the output of cat and send it as input to wc command.
Output

grep (find/search patterns)
grep [OPTIONS] pattern [files...]
To find the records for India with the populatin.csv file execute the below command
grep India population.csv

NOTE: It will bring in all the records, including where the word India is part of other word, like “Indian”.
To exactly match the word India we can use the -w flag
grep -w "India" population.csv
By default grep does a case-sensitive match. To ignore case sensitivity use -i.
NOTE: You can use regular expression with grep. It will be covered in the subsequent part of the tutorial.
Using them all together
Let’s say we ant to find the text “Lower” or “lower”, within all the records that contain the text “India”.
cat population.csv | grep -wi "India" | grep -wi "Lower"

NOTE: Mastering grep will make you a linux ninja.
So head over to →man grep for more details.
Make a copy of a file
cp <source> <destination>
Output: A new file with the name <source> will be created with the content of the <destination>. The destination can be a directory as well. If it’s a directory the source is copied to the destination directory.
For e.g.
cp population.csv pop-backup.csv
Output: The content of population.csv will be copied to a new file pop-backup.csv
NOTE: If pop-backup.csv already exist, it will silently overwrite it.
Copy all files from the current folder to the new folder
cp *.* <new-folder>
NOTE: The new folder should already be present.
cp *.* backup
Assuming there is a backup folder with the current directory the above command will copy all files to the backup directory.
Recursively copy all files from a directory to another directory
cp -r <source-directory> <target-directory>
If the <target-directory> does not exist, cp will automatically create it.
For example
cp -r *.* backup3
The above command will copy all files and directory from the current folder to a new folder called backup3. If backup3 already exists it will be overwritten.
Renaming/Move a file
To rename a file use the below command
mv <old-file> <new-file-name>
Example
mv pop-backup.csv population_backup.csv
Output: After executing the above command the pop-backup.csv will be renamed to population_backup.csv. Also, pop-backup.csv will no longer be available.
Removing files and directories
rm command is used to remove files.
rm <filename>
rmdir is used to remove a directory (if the directory is not empty).
rmdir <directory-name>
To remove a directory which is not empty use the below command
rm -rf backup3
The above command will remove all the files in backup3 directory as well as the directory itself.
Know the amount of disk space available
df command displays the amount of disk space available on the file system containing each file name argument. If no filename is passed as an argument with df command then it shows the space available on all currently mounted file systems.
For example to know the disk space on the file for population.csv execute the below command
df population.csv
Observe the output
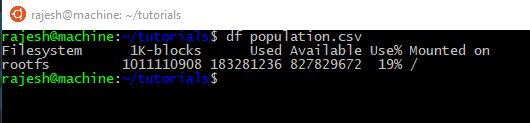
The bytes are quite huge and to display in human readable form use the -h option.
df -h population.csv

So, -h prints the output in human-readable form.
To know the size of all mounted devices execute the below command
df -h
There are lot of options that goes with df. So
man df
to learn more about df and other commands.
Know the amount of diskspace used
du command, short for disk usage, is used to estimate file space usage. The du command can be used to track the files and directories which are consuming an excessive amount of space on the hard disk drive.
du
Show the disk usage of all the folders in the current directory.
du /home/rajesh
Output

Shows the disk usage of all the folders within the rajesh directory. You can use the -h option for human readable form.

To get the summary information only use the -s option
du -sh /home/rajesh

To get summary information of all files /folders use the below command
du -sh * /home/rajesh

Users and Groups
Users are accounts that can be used to login to a system. Each user is identified by a unique identification number or UID by the system. All the information of users in a system are stored in
↳ /etc/passwd file. The hashed passwords for users are stored in
↳/etc/shadow file.
Users can be divided into two categories on the basis of the level of access:
- Superuser/root/administrator: Access to all the files on the system.
- Normal users: Limited access.
Let’s create some more users in the system.
Create New User (default home directory)
By default when you use useradd to create a new user it creates the new users home directory under /home directory with username. This you can verify in the below figure showing content of the /etc/passwd file.
useradd user1
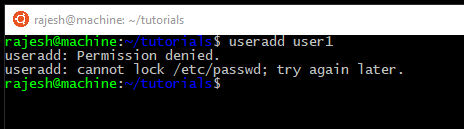
If you get the above error, it means you don’t have enough permission to do the above operation. To fix this execute the above command as a superuser by using sudo.
sudo useradd user1
Once you create a user, a new entry is added to the /etc/passwd file. You can verify it by executing the below command.
tail /etc/passwd

The format of the entry in the passwd is as below.
[username]:[password]:[UID]:[GID]:[GECOS]:[home_dir]:[shell_path]
- Username field
- Password field — An `x` in this field denotes that the encrypted password is stored in the /etc/shadow file.
- The user ID number (UID)
- User’s group ID number (GID)
- Additional information field such as the full name of the user or comment (GECOS)
- The absolute path of the user’s home directory
- Login shell of the user
What happens when you create a new user?
When a new user is created, by default system takes the following actions:
- Assigns UID to the user.
- Creates a home directory
/home/. - Sets the default shell of the user to be
/bin/sh. - Creates a private user group, named after the username itself.
- Contents of
/etc/skelare copied to the home directory of the new user. - .bashrc, .bash_profile and .bash_logout are copied to the home directory of new user.These files provide environment variables for this user’s session.
By default the newly created user will be in a locked state.
Setting a password for the newly created user.
sudo passwd user1
It will ask to enter and confirm a new password.

NOTE: Using sudo here as I don’t have access by default for changing the password.
Login as the newly created user
Execute the ‘su’ command
su user1 ↲
And enter the password and if successful you will be logged in as user1.
Create a User with different Home directory
By default ‘useradd’ command creates a user’s home directory under /home directory with username.
This can be changed by using ‘-d’ option along with the location of the new home directory.
For example, to create a new user ‘user2’ with a home directory ‘/projects’ execute the below command.
$ sudo useradd -d /projects user2
Let’s give it a password
$ sudo passwd user1
Verify the output with
$ getent passwd

You can see that the user2 is assigned /projects as the home folder.
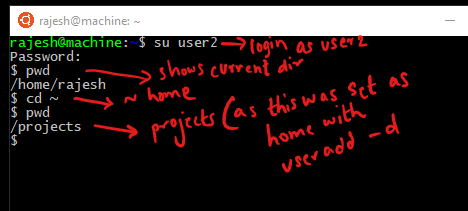
Login as user2
su user2
Change to home directory
cd ~
Do a pwd
pwd
The output should be /projects
Create a User with different Home directory
In some cases we may want to create users without assigning a home directory. In this case when the user logs in the home directory will be the root.
When such user uses su command to change login, its login directory will be the previous user’s home directory.
To create user without a home directory use the -M switch.
$ useradd -M user3
Create a User with Account Expiry date
By default when we create a user with ‘useradd’ command, the user account never expires, i.e. the expiry date is set to 0.
Let’s create a user with an expiry date. A very common security need. We have to use the ‘-e’ switch/parameter to set a new expiry date.
$ useradd -e 2019-12-31 tempuser
Executing the above command creates a user with the username ‘tempuser’ which is set to expire on 31st Dec 2019.
Now post 31st Dec 2019 if tempuser tries to log in to the system, the access will be denied.
Change / See user’s password aging/expiry information
use the ‘chage’ (change age) command.
$ chage -l username
Output
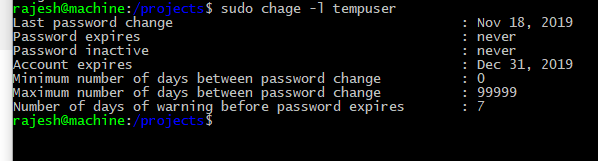
📖Exercise: Learn more about ‘chage’ command.
Modify user attributes
usermod command can be used to modify user attributes.
Set User Account Expiry Date
Let’s set change the account expiry date of user2.
First, lets check the current expirty date
$ chage -l user2

As you can see, the account is set to never expire.
$ sudo usermod -e 2019-12-01 user2
Let’s check the status again
$ chage -l user2
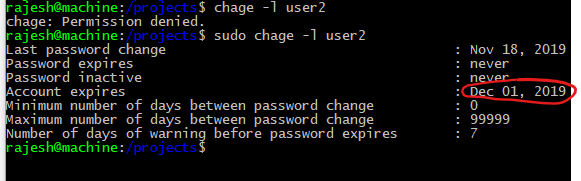
The expiry date is successfully set.
NOTE: The date format for the command is yyyy-mm-dd
Change User Primary Group
Let’s change the user’s primary group. By default when a new user is created a it belongs a group with the same name as the username.
For e.g. let’s check the group name of user2. We can use the id command for the same.
$ id user2
The output
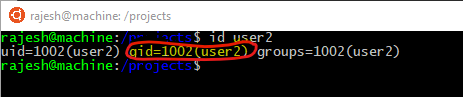
So the above output shows that user2 belongs to the group user2.
Let’s change the group to ‘developers’.
$ usermod -g developers user2
If the “developers” group is not already created, we will get the error as

So, let’s create the group first.The groupadd command can be used to create user groups.
$ sudo groupadd developers
To see all the user groups in the system execute the below command.
$ cat /etc/group
Now execute the usermod command again.
$ sudo usermod -g developers user2
Let’s confirm the change using the id command
id user2
The output

So, this successfully changes the user’s default group.
Assigning supplementary groups
Supplementary groups are additional groups that can be assigned to user.
To add “user2” to the “testers” group leaving the other group assignments as is, execute the below command. (Assuming “testers” group is already created)
If not then create the group first as shown below
$ sudo groupadd testers # if not already created
$ usermod -a -G testers user2 # NOTE: upper case G
- a ->add the user to the supplementary group(s). Use only with the -G option
- -G -> a list of supplementary groups which the user is also a member of.
Check whether a user exists in the Linux system
Let’s check whether user2 exist in the system.
$ getent passwd | grep user2
OR
$ getent passwd user2

Check how many user accounts we have on our system
$ getent passwrd | wc -l
Get logged in username
$ whoami
List all users in the system
$ getent passwd
Permission in Linux (Work in Progress)
Linux is secured by default. Let’s do an ls long listing and take a look at the permission.ls -l # will show long listing with more details
The output of the long list is shown below.
Observe the highlighted section.
The drwxrwxrwx sections are for permission settings. The ‘d’ indicates that the entry is for a directory. (Other than the letter ‘d’, there can also be an ‘l’, indicating symbolic link (we will talk about it in later part of the article).
r →read permission
w →write permission
x →execute permission (execute is for scripts and for a directory it means you can enter a directory (i.e. cd into it and to access any of its files)
Let’s take a detailed look at the ls -l listing.
- The first character will always be either a ‘-‘, which means it’s a file, or a ‘d’, which means it’s a directory.
- The next nine characters (rw-r–r–) show the security; we’ll talk about them later.
- The next column shows the owner of the file. In this case, it is me, my userID is “rajesh”.
- The next column shows the group owner of the file, in this case, the default name of the group is rajesh.
- The next column shows the size of the file in bytes.
- The next column shows the date and time the file was last modified.
- And the final column gives the filename.
Grokking the security permission
Let’s break down the 9 characters into an easy representation.

Read, write, execute and –
- The ‘r’ means you can “read” the file’s contents.
- -The ‘w’ means you can “write”, or modify the file’s contents.
- The ‘x’ means you can “execute” the file. This permission is given only if the file is a program or a directory.
- If any of the “rwx” characters are replaced by a ‘-‘, then that permission has been revoked.
User, group and others
- user — The user permissions apply only to the owner of the file or directory. They will not impact the actions of other users.
- group — The group permissions apply only to the group that has been assigned to the file or directory. They will not affect the actions of other users.
- others — The others permissions apply to all other users on the system. This is the permission group that you want to watch the most.
Reading the security permissions
Let’s undersand a bit more about how to read the security permissions.

Consider that the user’s permissions for the above file, posts. The first character is -meaning its not a directory.
The first three character is “rw-”. This means that the owner of the file (“rajesh”, i.e. me) can “read” the contents of the file and “write” it (modify its contents). I cannot execute it because it is not a program or the execute permission is not yet assigned.
If “r-x” is the second set of 3 characters it means that the members of the group named “rajesh” can only read and execute the files.
The final three characters reprsents the permissions allowed to anyone who has a UserID on this Linux system. Let’s say we have the permission (“r–“). This means anyone in our Linux system can read, but they cannot modify the contents of the files or execute them.
Changing security permissions
chmod is the command used to change the security permissons. It stands for “change mode”.
TIP: Good time to header over to $ man chmod
Steps to change permissions.
- The first argument to chmod is ‘u’,’g’,’o’ respectively for user, group and others. A combination of them can also be used.
- After this use a ‘+’ for adding or ‘-’ for removing and ‘=’ for assigning a permission.
- Then specify the permission, as r, w, or x (read, write, execute). Here too we can use a combination of rwx.
- One or more permissions can be modified by using a commas
- And finally the name of the file whose permission is being changed.
Example
To give “execute” permission to the “owner” for file “install.sh”, you would execute the below command.
Let’s create a simple shell script. A script is a collection of code which can be executed.
$ touch install.sh
Let’s put some content into the file. You can use the “vi” or “nano” editor to edit the file. Put the below content into the
echo "This is a demo script"
Now, check the permission of the file by typing
$ ls -l

Take a look. Even the owner (u), in this case ‘rajesh’ doesn’t have execute permission.
Let’s try to execute the file as shown below.
$ ./install.sh
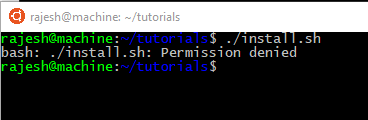
You get the permission denied error.
Now let’s give execute permission to the user.
chmod u+x install.sh

Now, let’s try to execute the script as shown below again.
$ ./install.sh
Output: Success

CAUTION: Do not put spaces in file names or folder names. You can separate long file/folder name with a hyphen — or an underscore _