Understand Angular by building an application step by step.
Architecture
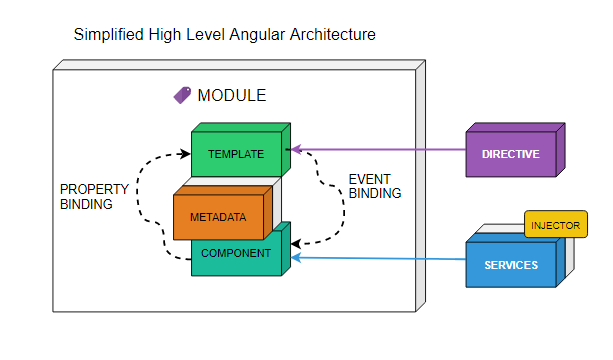
There are 8 main building blocks of Angular App as shown below.
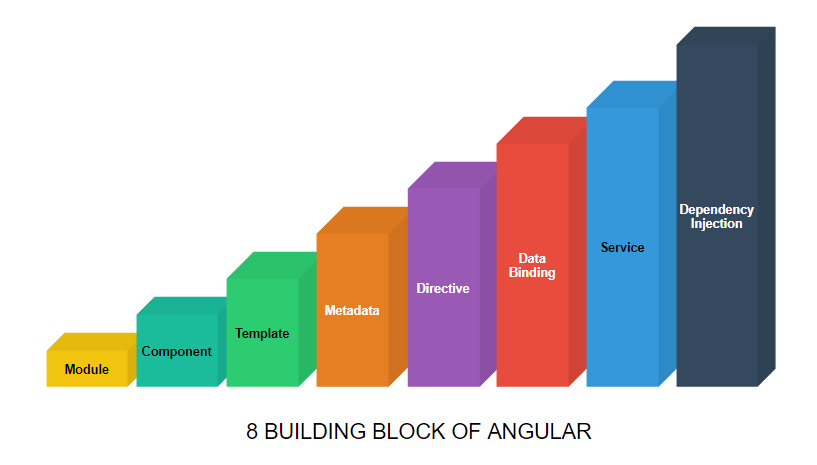
Module
The angular app has its own modularity system called the Angular Module of NgModule . Every Angular app has at least one module known as root module.
Component
The component is a controller class that encapsulates the view and the logic. The component class interacts with the view using the built-in API’s.
Template
The component’s view can be defined by templates. Templates are HTML’s that controls how things should be structured on the screen.
Metadata
Metadata is data about data. In Angular, metadata informs the Angular run time on how to process a class. The class case is the @Component decorator which identifies the class immediately below it as the component class.
Directives
A Directive is a class with @Directive decorator. So, technically a component is a directive with a template. There are two types of directives. Structural and Attribute directive.
Data Binding
Data binding binds the template and its component with the required data. So, we have interpolation, property binding, event binding and two-way binding (ngModel directive)
Services
Services are JavaScript functions designed to do specific tasks. It is a class that can perform certain activities like logging, data service, caching, configuration, etc. There is no service base class but it is one of the fundamental aspects of Angular Apps.
Dependency Injection
DI is a way to supply the instance of a class with fully form dependencies to other class/components. It’s one of the core features which keeps your angular apps loosely coupled.
NgModule
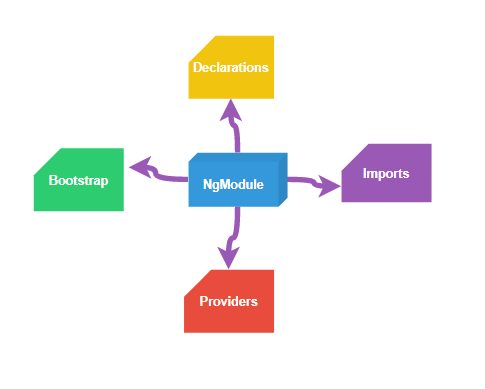
The NgModule properties for the minimum “AppModule” generated by the CLI are as follows.
- declarations- The components, directives, and pipes that belong to this NgModule.
- exports: The subset of declarations that should be visible and usable in the component templates of other NgModules.
- imports — Every application must import BrowserModule to run the app in a browser. Other modules whose exported classes are needed by component templates are declared in this NgModule.
- providers — Required for service registration
- bootstrap — The main application view, called the root component, which hosts all other app views. Only the root NgModule should set the bootstrap property. This is the root App Component that Angular creates and inserts into the DOM(index.html).
NOTE: BrowserModule imports CommonModule, which contributes to many common directives such as ngIf and ngFor. Additionally, BrowserModule re-exports CommonModule making all of its directives available to any module that imports BrowserModule
Installing Angular CLI
You use the Angular CLI to create projects, generate application and library code, and perform a variety of ongoing development tasks such as testing, bundling, and deployment.
Install the Angular CLI globally.
To install the CLI using npm, open a terminal/console window and enter the following command:
npm install -g @angular/cli
Create a new Project
To create a new project run the CLI command ng new <app-name> (From command line / Terminal)
ng new <app-name>
We will name our app “demo-app”
ng new demo-app
Once this command is successfully executed, Angular will create a new folder by the name <app-name> as specified and also download all the necessary dependency scripts.
To run the application
cd demo-app// use the name you provided for the app-name
ng serve --open
Default Angular App Folder Structure
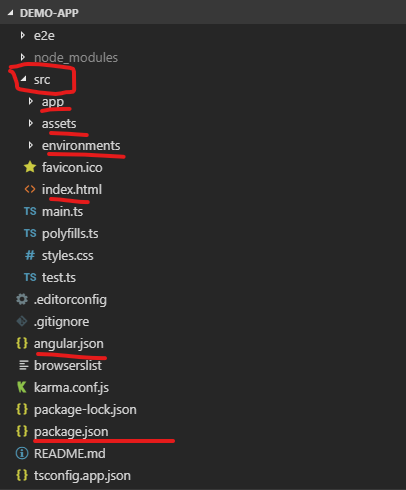
Some of the important files/folders are underlined for reference.
NOTE: I have kept some portion of the code intentionally simple and some bad practice has creeped out in the early example (as you will encounter this in your projects.). In later part of the tutorials I will expand on this and correct this by doing the necessary refactoring.
Application in action (Amazing Todo App)
Let’s build a Todo application using step by step approach.
Full source code available at github: Angular App — Part 1
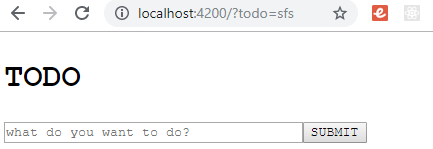
Task 1: Create an input to capture todo title and add submit button.
User Story: A user should be able to input new todo.
Open the file app.component.html and add the code as shown below.
File: app.component.html
<div>
  <h2 class="app-title">Todo</h2>
  <form>
    <input class="input-title" name="todo"
       type="text" #newTodo
       placeholder="what do you want to do?" />
    <button (click)="addTodo(newTodo)">SUBMIT</button>
  </form>
</div>
Modify the app.component.ts file as shown below.
import { Component } from '@angular/core';@Component({
selector: 'app-root',
templateUrl: './app.component.html',
styleUrls: ['./app.component.css']
})export class AppComponent {
title = 'Angular TODO App';
todos = [
{ id: 1, title: "Task 1", completed: false },
{ id: 2, title: "Task 2", completed: false }
];
}Let’s add some basic styles to it. Open up app.component.css and add the following styles. We have the basic styles here and will add more styles as required by the application. Feel free to be creative here and style the UI as needed.
File: app.component.css
*{
  font-family: 'Courier New', Courier, monospace;
}
.app-title {
  font-size: 2em;
  text-transform: uppercase;
}
.input-title {
  width:60%;
}
.todos {
  margin: 0;
  padding: 0;
  font-size: 1.4em;
  margin-top: 10px;
  border: 1px solid #0077C0;
}
.todo-item {
  display: flex;
  flex: 1;
}
.todo-title {
  flex: 1;
}
.buttons {
  box-sizing: border-box;
  display: flex;
}
.todo-item button  {
  border: 1px solid #0077C0;
  background: none;
  box-shadow: none;
  margin: 5px;
}
.buttons delete {
  background-color: "";
}
.todo-item button:hover {
  border: 1px solid #0077C0;
  background: #A6A6A6;
  box-shadow: none;
}
The above code sets up the stage for creating a complete todo (task management application)
User Action: Run the application.
Output: Assuming your application is already running the browser should display the following output (Run the app using ng serve — — open)
Lessons Learned:
- Adding CSS
- Creating input elements
- Initializing state variables in the component class.
- Creating template element reference variable (#newTodo). We will be using this in the upcoming task to grab the HTML element and get the value from it.
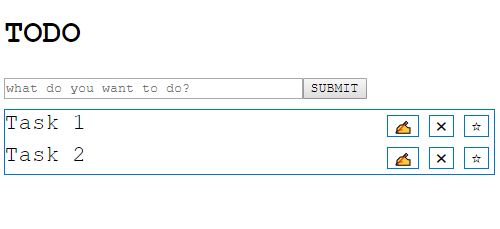
Task 2: Display the list with edit, delete and favorite button.
User Story: When a user visits the app, a list of already saved todos if any should be presented.
File: app.component.html
<div>
  <h2 class="app-title">Todo</h2>
  <form>
    <input class="input-title" name="todo" type="text" #newTodo
      placeholder="what do you want to do?" />
    <button (click)="addTodo(newTodo)">SUBMIT</button>
  </form>
  <ul class="todos">
    <li class="todo-item" *ngFor="let todo of todos">
      <span class="todo-title">{{todo.title}}</span>
      <span class="buttons">
        <button>✍</button>
        <button class="delete">✖</button>
        <button>☆</button>
      </span>
   </li>
  </ul>
</div>
User Action: Run the application.
Output: The browser should display the following screen.
Lessons Learned:
- Use *ngFor structural directive to loop through and render dynamic DOM elements.
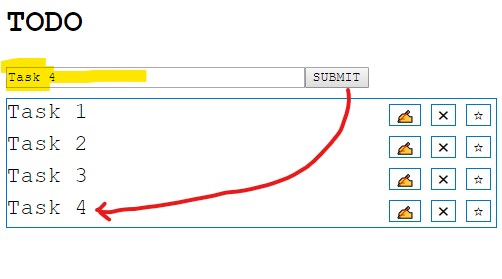
Task 3: Add a new todo on click on submit button or on pressing the enter/return key.
User Story: When the user presses the ente key or submit button the new todo should be saved to the store.
<button (click)="addTodo(newTodo)">SUBMIT</button>
We attach event handlers to element by wrapping the event name within parenthesis as shown in the above code block. So, the above code indicates that whenever a click event happens to invoke a method called addTodo. The addTodo will be defined in the app.component.ts file.
Do note that we are passing the input element reference newTodo as a parameter to the addTodo function.
File: app.component.ts
Add a new method as shown below. I am only showing the relevant piece of code here.
addTodo(newTodo: HTMLInputElement) {
  var todo = {
    id: +new Date(),
    title: newTodo.value,
    completed: false
  }
  this.todos.push(todo);
  // Clear the todo input
  newTodo.value = '';
  return false;
}
NOTE: We will discuss better practices, validations as we progress in the course/tutorial.
Code Explanation:
- Create a new todo object variable. The new ID is created by converting the current datetime to integer value by prefixing the ‘+’. This we are only using for testing our app. In production scenarios, this ID should be generated on the server or use the uuid generator module.
- We then add the newly created variable to our todos array.
- We clear the todo input element.
- Finally, we return false to prevent the default form submission behavior.
User Action: Run the application. Type in some todos and press enter/return key or click the SUBMIT button. A new todo should be created and dynamically rendered on the screen.
Output: The browser should display the following screen.
Lessons Learned:
- Connective events to buttons and invoking logic in the component class.
- Array push method.
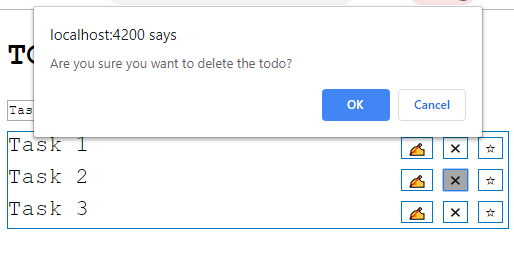
Task 4: Delete a todo
User Story: A user should be able to delete/remove the todo.
Let us now add the feature to delete a todo when the user clicks the delete ‘button’. As a good developer, the first thing that we do before actually delete the record is to “ask for confirmation” from the user.
Let’s take look at the changes in the HTML.
File: app.component.html
<button class="delete" (click)="deleteTodo(todo.id)">✖</button>
We add the click event handler to the delete button. When the button is clicked a method called deleteTodo with the current todo ID is being passed to the component.
File: app.component.ts
deleteTodo(id) {
  let confirm = window.confirm(`Are you sure you want to delete the
      todo?`);
  if (!confirm) return;
  var newTodos = this.todos.filter((todo) => {
    return todo.id != id;
  });
  this.todos = newTodos;
}
User Action: Run the application. Click on any todo to delete. A confirmation dialog should come up. On click of “Yes” the todo should be deleted. And on clicking “No”, the delete operation should be cancelled.
Output: The browser should display the following screen.
Lessons Learned:
- Array filter method
- window.confirm for showing native confirmation dialog.
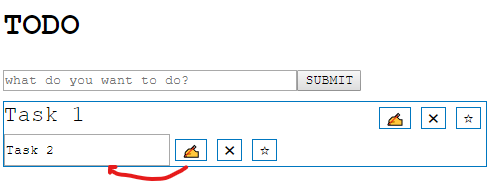
Task 5: Toggle a todo for edit.
User Story: A user should be able to edit the todo. For editing he should be presented with an input element.
Let’s add a feature to toggle a todo item to edit mode when the edit button is clicked.
Let’s change the component and add the edit property to each todo item.
File: app.component.ts
todos = [
  { id: 1, title: "Task 1", completed: false, edit: false },
  { id: 2, title: "Task 2", completed: false, edit: false }
];
Let us also add a method to toggle the todo, which will be invoked from the HTML.
toggleEdit(id) {
  var todoEdit = this.todos.find((todo) => {
    return todo.id == id;
  });
  todoEdit.edit = !todoEdit.edit;
}
The toggleEdit functions grab the todo item with id (we use the array find method here) and change the edit value to true/or false using the ! operator. So, if the edit value was true !edit will result in false and vice versa.
Let us now modify the HTML and connect the edit event as well as toggle the todo from span to input and vice versa.
File: app.component.html
<ul class="todos">
  <li class="todo-item" *ngFor="let todo of todos">
    <input *ngIf="todo.edit" value={{todo.title}} />
    <span *ngIf="!todo.edit" class="todo-title">{{todo.title}}
    </span>
    <span class="buttons">
      <button (click)="toggleEdit(todo.id)">✍</button>
      <button class="delete"
         (click)="deleteTodo(todo.id)">✖</button>
      <button>☆</button>
    </span>
  </li>
</ul>
Changed Lines:
- Code change in line 3, 4 and 6.
- We use the *ngIf directive to show/hide the element based on the value of the edit property.
- Also, we connect the toggleEdit event to the button.
- We bind the todo.title to the input value.
User Action: Run the application and click on the edit button multiple times to toggle the edit mode.
Output: The browser should display the following screen.
Lessons Learned:
- *ngIf structural directive to show/hide element. The *ngif element doesn’t event render the element to the DOM if the condition is false (compare with *ngShow).
- Array find method
Task 6: Save the edited todo back to the component instance.
User Story: A user should be able to save the edited todo back to the store by pressing the ENTER/RETURN key.
We will now add a feature to save the edited todo back to the component instance. We trap the enter key on the input element to save the updated todo.
Steps:
- Add (keyup) event to input element.
- Call the editTodo method and pass in the event, the todo id and the todo value).
Let’s change the html first and add the required keyup event.
File: app.component.html
<input *ngIf="todo.edit" #dirtyTodo
  (keyup)="editTodo($event, todo.id, dirtyTodo.value)"
  value={{todo.title}} />
Replace the old edit input with the above code. Here we attach the keyup event and invokes the editTodo method passing in the browser event object, the todo ID and the modified todo value.
NOTE: $event refers to the current input elements event (KeyboardEvent, MouseEvent, etc.)
Let’s add the required logic in the component file.
File: app.component.ts
First, let’s extract the logic to find a todo by ID to its own internal method (as this can be reused at other places in the code).
_findTodo(id) {
  var todoItem = this.todos.find((todo) => {
    return todo.id == id;
  });
  return todoItem;
}NOTE: I am using == here. But internet(metaphorically referring) says to use ===. We will discuss more in the latter part of the text.
Let’s now implement the editTodo method. The editTodo method uses the _findTodo method and updates the title to the modified value. One the title is updated, it invokes the toggleEdit method again to reset the edit state back to default.
editTodo(event, id, newTitle) {
  if (event.which === 13) {
    var found = this._findTodo(id);
    found.title = newTitle;
    this.toggleEdit(id);
  }
}
Now since JavaScript returns the objects by reference, change the found todo’s title changes the original array as well. (More on state management later).
Now since we already extracted a _findTodo method, let’s also refactor the code for toggleEdit and make use of the _findTodo method there as well. (Good practice).
CAUTION: Not doing error check here yet (as summing the id is being passed from the browser). More on error handling coming up in the upcoming section.
toggleEdit(id) {
  var todoEdit = this._findTodo(id);
  todoEdit.edit = !todoEdit.edit;
}
See the full diff here https://github.com/rajeshpillai/angular-todo-instructor/commit/f184f8a168181de31d6dd8f43b2d8617424fe5a4
User Action: Run the application and click on the edit button and modify the todo title and press enter button to save the updated title back to the component.
Lessons Learned:
- keyup event handling and trapping for specific keys.
- Detect ENTER/RETURN key press (keycode 13)
- Refactoring for reuse.
Task 7: Cancel/Undo the edit feature
User Story: A user should be able to undo/cancel the changes.
We will now add a feature to cancel/undo edit. We trap the enter key on the input element to cancel the edit when the user presses the ‘ESC’ key.
Steps:
- Update the editTodo method on the component and look for ‘ESC’ key.
File: app.component.ts
editTodo(event, id, newTitle) {
  if (event.which === 27) {
    this.toggleEdit(id);
    return;
  }
  if (event.which === 13) {
    var found = this._findTodo(id);
    found.title = newTitle;
    this.toggleEdit(id);
  }
}
The updated code is from line 2 to line 5. We look for keycode, 27 , which represents the ESC key. Once we detect the ESC key is pressed we simply invoke the toggleEdit function.
User Action: Run the application and click on the edit button and modify the todo title and press ESC key to undo the changes.
Lessons Learned:
- Detect ESC key press (keycode 27)
Task 9: Refactor todo state
Let us now refactor the component data/state to represent our real-world todo app. The first thing I will do here is to put the todos withing the parent store object. This will enable me to add more objects as required and also keep a single parent hierarchy.
File: app.component.ts
Wrap the todos object within a parent store object.
store = {
  todos: [
    { id: 1, title: "Task 1", completed: false, edit: false },
    { id: 2, title: "Task 2", completed: false, edit: false }
  ]
}
Change the respective methods and replace them with this.store.todos wherever the code is directly accessing this.todos object. The modified code is highlighted below.
addTodo(newTodo: HTMLInputElement) {
  var todo = {
    id: +new Date(),
    title: newTodo.value,
    completed: false,
    edit: false  //todo:
  }

  this.store.todos.push(todo);
  newTodo.value = '';
  return false;
}
deleteTodo(id) {
  let confirm = window.
       confirm(`Are you sure you want to delete the todo?`);

  if (!confirm) return;
  var newTodos = this.store.todos.filter((todo) => {
    return todo.id != id;
  });

  this.store.todos = newTodos;
}
toggleEdit(id) {
  var todoEdit = this._findTodo(id);
  todoEdit.edit = !todoEdit.edit;
  this.log("edit: ", todoEdit);
}
editTodo(event, id, newTitle) {
  if (event.which === 27) {
    this.toggleEdit(id);
    return;
  }
  if (event.which === 13) {
    var found = this._findTodo(id);
    found.title = newTitle;
    this.toggleEdit(id);
  }
 }
_findTodo(id) {
  var todoItem = this.store.todos.find((todo) => {
    return todo.id == id;
  });
  return todoItem;
}
Now update the html as well.
File: app.component.html
Only the *ngFor is required to be changed to store.todos.
<li class="todo-item" *ngFor="let todo of store.todos">
NOTE: This was a minor refactoring which will come in handy as our application grows.
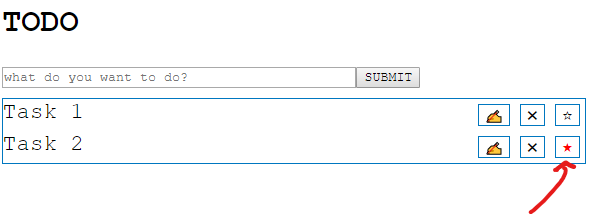
Task 10: Implement favorite/bookmark feature
User Story: A user should be able to favorite/bookmark specific todo items by clicking on the bookmark option.
A technical decision is made at this point to store bookmarks separately from todos so that in later part when we add an actual store, we can easily isolate data persistence.
Steps:
- Update the HTML and render the todo bookmark button according to the status.
- Implement a toggleBookmark method.
File: app.component.html
<button title="click to toggle bookmark
    [className]="_isTodoBookmarked(todo.id)?'bookmarked':''
    (click)="toggleBookmark(todo.id)">
<span *ngIf="!_isTodoBookmarked(todo.id)">☆</span>
  <span *ngIf="_isTodoBookmarked(todo.id)">★</span>
</button>
File: app.component.ts
toggleBookmark(todoId) {
  var bookmark = this.store.bookmarks.find((bm) => {
    return bm.todoId == todoId;
  });

  if (!bookmark) {
    this.store.bookmarks =
     [{ todoId: todoId, bookmarked: true },
        ...this.store.bookmarks]
  } else {
    this.store.bookmarks = this.store.bookmarks.filter((b) => {
      return b.todoId != todoId
    })
  }
}
_isTodoBookmarked(todoId) {
  //console.log(`checking bookmark status...`)
  var todoItem = this.store.bookmarks.find((bm) => {
    return bm.todoId == todoId;
  });
  return todoItem;
}
Explanation:
The toggleBookmark method first gets the bookmark by todoId. If the bookmark is not found it adds a new entry into the bookmarks array. And if the bookmark is found it is removed from the array.
NOTE: We are not yet using the bookmarked property on the bookmark object yet.
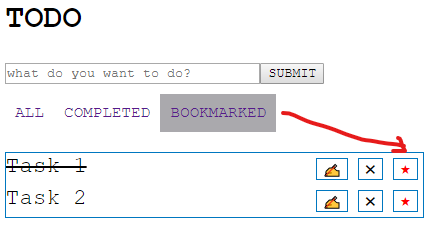
User Action: Run the application and click on the bookmark to toggle the state.
Output: The browser should display the following screen.
Lessons Learned:
REVISE
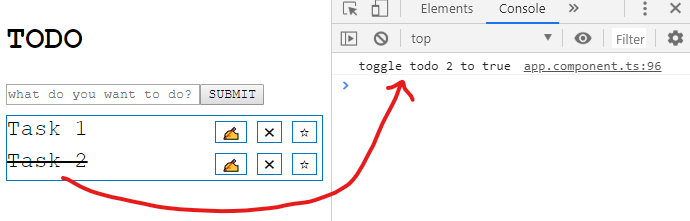
Task 11: Mark a todo/task as complete
User Story: A user should be able to toggle the state of todo to complete and vice-versa.
Technical Implementation: We will add a feature to toggle the todo state when the user double clicks on the individual todo item.
Steps:
- Update the HTML and add a double click handler toggleCompleted() on the todo item.
- Implement a toggleCompleted() method on the component.
File: app.component.html
<span *ngIf="!todo.edit" (dblclick)="toggleCompleted(todo.id)" class="todo-title">
  {{todo.title}}
</span>
File: app.component.css
.todo-item {
  display: flex;
  flex: 1;
  cursor: pointer;
  user-select: none;
}
.completed {
  text-decoration-line: line-through;
}
File: app.component.ts
toggleCompleted( id) {
  console.log(`toggle todo ${id}`);
  var found = this._findTodo(id);
  found.completed = !found.completed;
}
User Action: Run the application and double click on todo item to toggle between complete and incomplete state.
Output: The browser should display the following screen.
Lessons Learned:
1.N/A
Task 12: Create a filter menu/toolbar to filter the todos
User Story: A user should be able to filter todos. The option he can choose is “All”, “Completed”, “Bookmarked”
File: app.component.html
<div class="filter-container" (click)="onFilterChange($event)">
  <a [class.filter-current]="filterAction=='all'" name="all"
     href="#">ALL</a>
  <a [class.filter-current]="filterAction=='completed'"
     name="completed" href="#">COMPLETED</a>
  <a [class.filter-current]="filterAction=='bookmarked'"
     name="bookmarked" href="#">BOOKMARKED</a>
</div>
File: app.component.css (full css)
.filter-container {
  margin-top: 20px;
  padding-right: 5px;
  padding-bottom: 20px;
}
.filter-container  a {
  text-decoration-line: none;
  padding: 10px;
}
a.filter-current {
  text-decoration: underline;
  background: #AAA9AD;
}
File: app.component.ts
First let’s update a key named “filteredTodos” in the store.
store = {
  todos: [
    .....  // other code remains same
],
filteredTodos: [],  // Add this
  ...
}
Let’s add an instance variable to track the current filter.
filterAction = "all";
Let’s add a constructor to initialize the default filteredTodos values.
constructor() {
  this.store.filteredTodos = [...this.store.todos];
}
Let us now add the onFilterChange method. This is the core of the filter function. It checks for the target name and accordingly filters the result
onFilterChange(event) {
  var action = event.target.name.toLowerCase();
  this.filterAction = action;
  this.changeFilter(action);
}
The onfilterChange uses a helper method changeFilter. changeFilter will also be used from add, delete so that the correct data is displayed on the screen.
changeFilter(action) {
  switch (action) {
    case "all":
      this.store.filteredTodos = [...this.store.todos];
      break;
    case "completed":
      this.store.filteredTodos =
       this.store.todos.filter((todo) => {
        return todo.completed;
      });
      break;
    case "bookmarked":
      this.store.filteredTodos =
        this.store.todos.filter((todo) => {
          if (this._isTodoBookmarked(todo.id))
            return todo;
       });
      break;
  }
}
The modified addTodo and deleteTodo method.
addTodo(newTodo: HTMLInputElement) {
  var todo = {
    id: +new Date(),
    title: newTodo.value,
    completed: false,
    edit: false  //todo:
  }
  this.store.todos.push(todo);
  this.changeFilter(this.filterAction);
  return false;
}
deleteTodo(id) {
  let confirm = window.
         confirm(`Are you sure you want to delete the todo?`);
  if (!confirm) return;

  var newTodos = this.store.todos.
    filter((todo) => {
       return todo.id != id;
  });

  this.store.todos = newTodos;
  this.changeFilter(this.filterAction);
}
User Action: Run the application and click on the filter options.
Output: The browser should display the following screen.
Screen 1
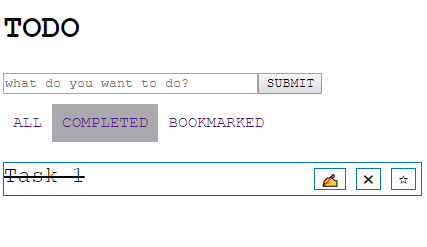
Screen 2
Lessons Learned:
- Showing hiding views based on condition
- Apply css class dynamically
- Filtering dataset on client.
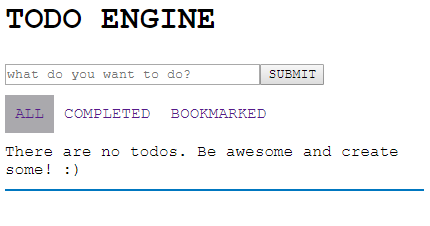
Task 13: When there are no todos, show a default message to the user.
User Story: When there are no todos the following message should be displayed.
Message: There are no todos. Be awesome and create some!
File: app.component.html
<div *ngIf="store.filteredTodos.length===0">{{noTodoMessage}} :)</div>
Explanation:
Show the message if the filteredTodos length is zero.
File: app.component.ts
noTodoMessage = `There are no todos for selected filter!`;
Explanation:
Create the noTodoMessage instance variable as shown above. This is bound to HTML.
User Action: Run the application and delete all todos.
Output: The browser should display the following screen.
Lessons Learned:
- Better practice. Always show user friendly messages on the screen.
Task 14: Refactoring to Todo model
Engineering Story: As our application is scaling we need to refactor the application and introduce a Todo model to abstract the todo related attributes and group them together as an object.
File: models/todo.model.ts (new file)
export class Todo {
  title: string;
  id: number;
  completed: boolean;
  edit: boolean;

  constructor(todo) {
    this.title = todo.title;
    this.id = todo.id;
    this.completed = todo.completed || false;
    this.edit = todo.edit || false;
 }
}
Explanation:
Create a Todo model class and assign the defaults in the constructor.
File: app.component.ts
Change the ‘store’ as shown below.
store = {
  todos: [
    new Todo({ id: 1, title: "Task 1",
          completed: false, edit: false }),
    new Todo({ id: 2, title: "Task 2",
          completed: false, edit: false })
],
filteredTodos: [],
  // {todoId: <>,  bookmarked: true/false}
  bookmarks: []
}
Modify the addTodo() method as shown below.
addTodo(newTodo: HTMLInputElement) {
  var todo = new Todo({
    id: +new Date(),
    title: newTodo.value,
    completed: false,
    edit: false  //todo:
  });
//... REST OF THE THINGS ARE SAME
}
User Action: Run the application.
Output: The browser should display the Todo app as-is. There will be no visible change in the UI.
Lessons Learned:
- Create a model class.
Source code
Full source code available at github: Angular App — Part 1
NOTE: The GitHub code may contain some additional CSS changes.
Level — 2 (to be done)
- Pagination
- Server side (nodejs)
- Routing
History
- 11-June-2020 – Moved from medium (with updates)
superb sir