Welcome to the JavaScript Ninja series. This is my first post on this topic and also on the medium blog. My agenda is to share my learning’s and dispel some myth about how certain things work or how it is kind of coded.
In this story we will try to dissect the concept of Promise and implement a bare-bone version from scratch. If you are a JavaScript developer, at some point you have to deal with some sort of Promise library.
Also, if you are using frameworks like Angular, React, Ember or other, you will or have already encountered some variations of Promise implementation.
Prerequisite:
Basic knowledge of JavaScript, understanding of “this”, context, callback.
If you are still interested, lets begin by understand the concept of Promise and how it can be implemented in JavaScript.
Please note our goal is to understand the concept from “First Principle” and we are not aiming to write production code, but then we will try to follow as much better practices as possible as long as I can keep the explanation simple.
First things first. There are lot of resources on the internet with great write-ups on JavaScript. I am inspired by many, but specifically I like articles/videos by Derick Bailey of watchmecode.net (NOTE: I am in no way affiliated to Derick or his website, but thought of sharing as I learned a lot from his blogs and videos).
Feel free to share your thoughts, suggestions, edits, tips in the comment section, or alternative implementation that will clear up the concepts.
What is a Promise?
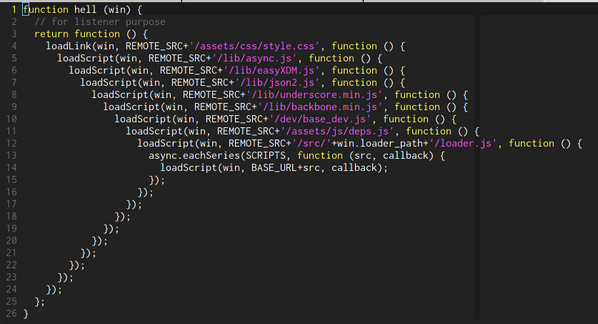
Primarily a Promise object represents the eventual completion or failure of an asynchronous operation and kind-of helps avoid the callback hell (though the primary purpose is not to solve the problem of callback hell).
In short a Promise is a guarantee that on execution of some asynchronous task, the completion status or the rejection status or the errors, if any will be communicated to the calling program in a guaranteed way.
Also one side benefit is Promise make asynchronous code look like sequential code.
Without promise our asynchronous code may look like the below figure. The image is adapted from google images (SO).
There are various Promise library and one of the widely used one is rsvp.js available at rsvp.
The standard reference for understanding Promise is also found at MDN.
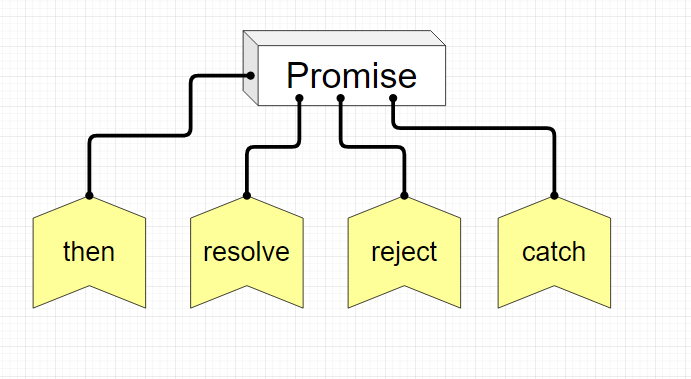
In our implementation we will stick to two approaches for designing the API. We will not implement all the features but the most important one, then, resolve and reject method, with a bit of error handling.
At a mimimum the promise should have the below four methods.
Let’s take an API first approach to design our library. Also please go through the code comments, as I don’t want to repeat things in the article what can be clearly conveyed in the code.
Approach 1:
Let’s build a simple HTML markup with a button. On click of the button, we need to execute a long running task. In this case we will not make any real AJAX calls, but will use setTimeout for our purpose.
<!DOCTYPE html>
<html>
<head>
  <meta charset="utf-8">
  <meta name="viewport" content="width=device-width">
  <title>JavaScript Ninja: Promise Explained</title>
</head>
<body>
  <input type="button" id="btn" value="Click me!"/>
</body>
</html>
Assume we have a long running task that has to be executed and resolved at two places in this small app. This is just for demo, we can resolve as many times as required.
- While Initial Load
- On click of the button
Let’s wrap the actual work to be executed in the below method. In the app.js (or any other file) put the below code.
function doLongRunningTask() {
  var promise = new MyPromise();
  setTimeout(function () {
     promise.resolve("I am done.");
  }, 3000);
  return promise;
}
In reality, inside this doLongRunningTask(), we can execute any function, ajax calls etc.
Here’ we are defining our API. We have a MyPromise constructor function (which we haven’t implemented yet, but will shortly).
To simulate long running task we are using setTimeout. In the above case, after 3 seconds the setTimeout will get executed and we will call the resolve() method of our promise object to indicate to the calling function/client that the work is completed.
In real case, this can be a remote ajax/api/rest api call which may not be immediately resolved.
To execute this function we will invoke it.
var response = doLongRunningTask();

// We can subscribe as many times as required using the "then" method.
response.then(function (result) {
  console.log("RECD: 1", result);
})
.then(function (result) {
  console.log("RECD: 2", result);
})
.catch(function (e) {
  console.log("ERROR CB: ", e);
});
At this point our API is slowly evolving. The doLongRunningTask() should return our MyPromise object. We can subscribe to get notified on the task completion by calling the “then” method.
Note here that we can chain the method calls and we can also subscribe multiple times.
Also, if any error happens in the execution, we have the catch method as well.
Additionally, we also want to get notified when the action is completed on button click as well. Note here that the act of clicking the button, and the promise resolution may not happen at the same time.
It may also happen that when the button is clicked the promise is already resolved, as we started the work on page load itself. In that case, the then() method should be immediately executed.
Here’s the code for button click. No fancy jQuery. Just pure JavaScript joy 🙂
var btn = document.getElementById("btn");
btn.addEventListener("click", function (e) {
   response.then(function (msg) {
    console.log("RECD: FROM promise: ", msg);
  });
});
So, far we have developed our API usage pattern, now lets look at the actual implementation of MyPromise, constructor function.
Lets begin with the constructor function. The code is well commented. I am sticking to ES5 (and not using modern ES6 features). The constructor function is invoked by the client by using new MyPromise() as demonstrated earlier.
In case you are creating the promise code in a separate file like “MyPromise.js”, make sure you include it in your HTML file.
// The constructor function
var MyPromise = function () {
this.callbacks = []; // All callbacks then() will be stored here
this.resolved = false; // initially the resolved will be set to false. This will be set to true, once the promise is resolved
this.data = null; // The data returned from the promise
this.errorCallback = null; // Error callback function
this.error = false; // If any error, this variable will be set to true
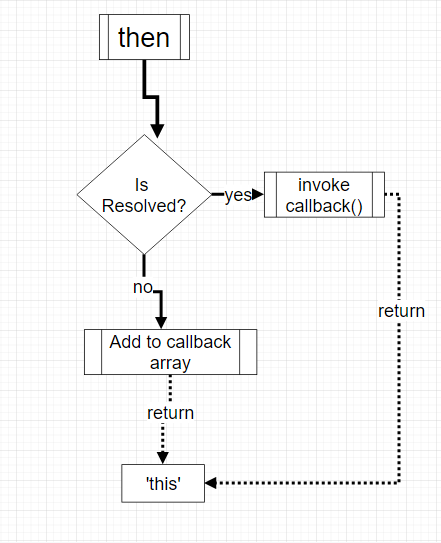
}Now, to register success callback, let us implement the then() method. As we can chain the then() method, we have to return “this” as part of return value of the function.
The workflow of ‘then’ method
Here’s the code snippet.
/**
The then() method takes a callback and stores it in the callbacks array. But we have to handle the case where, by the time then()
method is called, the promise may already be resolved. In that case, we directly invoke the callback and pass in the "data". This data
is made available from the resolve function().
**/
MyPromise.prototype.then = function (callback) {
if (this.resolved) { // If the promise is already resolved, invoke the callback with the data.
callback(this.data);
} else {
this.callbacks.push(callback); // Store the callback in the array
}
return this; // Return "this" to enable chaining
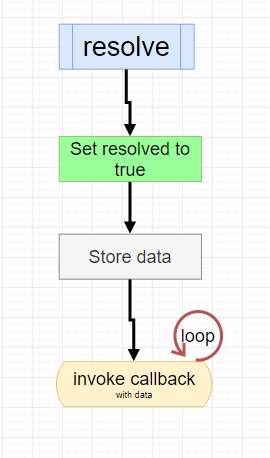
};Now, here comes the resolve() method. This is where the callback will be invoked with the returned data.
The resolve method workflow.
The resolve() code
/**
The resolve() method has the data as input, which will be passed by the client code.  First it sets the resolved property to true, stores the data for future use.

Then it loops through all callbacks and invoke the callback with the data.
**/
MyPromise.prototype.resolve = function (data) {
  this.resolved = true; // Set resolved to true
  this.data = data; // Store the data to be used in the then() method
  this.callbacks.forEach(function (callback) {
     // Loop through all registered callbacks and
    callback (data); // Invoke the callback with the data
  })
}
Let’s now define a simple catch function to handle error. This is the smallest function.
/**
The catch method takes the error callback and stores it in the errorCallback variable.
NOTE:  Return "this" from the method to enable chaining.
**/
MyPromise.prototype.catch = function (callback) {
  this.errorCallback = callback;                 // Set the error callback
  return this;
}
And finally the reject() method, which will use the error callback to raise error to the calling client.
/**
The reject method sets the error variable to true and invokes the error callback.
**/
MyPromise.prototype.reject = function (e) {
  this.error = true;                          // Set error to true
  this.errorCallback(e);                      // Invoke the error callback.  This is registered using the catch() method.
};
And lo behold, we have completed our first implementation of our own mini Promise library.
Approach 2:
The approach 2 is almost similar to approach one, but the API will be similar to rsvp.js and the native Promise object of JavaScript. I will put the delta code here for your kind perusal. The only thing that changed here is the constructor function.
Just to show you the usage, we can also use the below native like API for our promise library.
var rsvp = doWorkRsvp();  // Nothing changes here, just a new method to demo RSVP api syntax

// Rest of the API is same
rsvp.then(function (result) {
  console.log("RSVP RECD: 1", result);
})
.then(function (result) {
  console.log("RSVP RECD: 2", result);
})
.catch(function (e) {
  console.log("RSVP: ERROR: HANDLED", e);
});

function doWorkRsvp() {
  // ATTENTION: The API differs here.  Here' the resolve and reject method is pass as the call back function
  var promise = new MyRSVP.Promise(function (resolve, reject) {
    setTimeout(function () {
      resolve("I am done.");
    }, 3000);
  });
  return promise;
}
You will observe here that almost all the API is same , except the way the promise is created.
Lets’ look at the constructor function.
var MyRSVP = {};  // Let's create a namespace (not the most rubust way, but will work for our example.

MyRSVP.Promise = function (callback) {
  this.callbacks = [];
  this.errorCallback = null;
  this.resolved = false;
  this.data = null;
  this.error = false;
  this.callback = callback;

  // ATTENTION:  The callback method is executed, but since the reject and resolve method should point to correct context, we
  //are binding both the method to the "this" context, which in this case is MyRSVP.Promise construction function.
  callback(this.resolve.bind(this), this.reject.bind(this));
}
Here’ the important thing is in the constructor function the callback is executed with the context set to the correct instance. Rest of the code is exactly same as our earlier Promise implementation.
Hope you enjoyed reading this as much as I have enjoyed writing it.
If you like articles on similar concepts, feel free to share your thoughts in the comments. Please note, I may have omitted some better practices, error handling for brevity sake.
This is a quick write. In case you need more explanation or clarification, drop me a message in the comment. I will update the story.
The full source code can be found here at jsbin https://jsbin.com/valiki/4/edit?html,js,output
Thanks for your time. Cheers and “I Promise to post more similar stories in case you like this !!!”
Very good Article. A crystal clear explanation . Looking forward to many more such kinda articles.
Thank you. Take a look at data binding article as well. You may find it useful.